Hey all you Bloom users out there, today I want to show you how you can disable Google Fonts loaded by the Bloom eMail Opt-In Plugin by Elegant Themes completely. I am sure you are aware of the little Checkbox “Use Google Fonts”, but this doesn’t fully prevent Google fonts from loading…
Why should you disable the loading of Google Fonts by the Bloom Plugin?
Well, there are a few reasons to prevent the loading of the external fonts hosted by Google, let me explain:
- Unclear legal Situation: If you are targeting users in the European Union (like me), the common sense legal advice is to disable the loading of Google fonts, because some Websites actually got sued for using them.
- Performance: Even knowing google fonts is for sure a high performance CDN with reliable uptimes, it is nevertheless an extra request to an external source. This could slow down your website performance and affect your PageSpeed Insights scores.
If you agree with me I am sure you want to know how to proceed, right? Okay, lets begin 😉
1 Disable Google Font Setting in Bloom
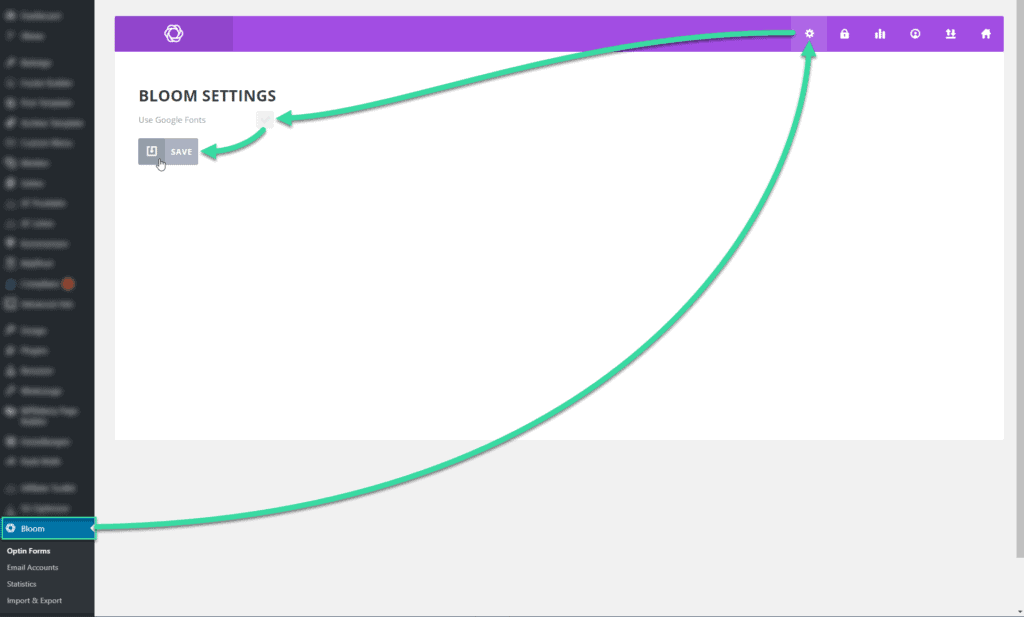
The first thing you will need to do is to disable the Checkbox “Use Google Fonts” in the Bloom Settings menu.
Speaking of menu: If you wan’t to know how to add Icons to your WordPress Navigation Menu, check out our Tutorial 😉

2 Completely Prevent loading
Afterwards, you will need to add a custom function snippet to your child themes functions.php file to completely disable the loading.
Before you proceed, be sure to create a backup of your site! You should only modify a child themes function.php file, to don’t get it overwritten by theme updates.
I can’t tell you why, but just unchecking the checkbox still loads google fonts when visiting your frontend. This function will stop Bloom from loading google font files:
function wpz_remove_bloom_google_fonts() {
	wp_deregister_style( 'et-gf-open-sans' );
	wp_register_style( 'et-gf-open-sans', false );
     }
add_action('wp_enqueue_scripts', 'wpz_remove_bloom_google_fonts');Code language: PHP (php)
The chances are good that this snippet will work right out of the box, just check your frontend if there are still google fonts loaded.
Press F12 in Chrome, switch to Network tab and to CSS file type.
If no google fonts are loaded anymore, just continue with step 3.
If you still see google fonts appearing in the sources tab, just follow the steps in the video above to open the initiator file and see what’s the actual style id. If the style id starts with ‘et-gf-…’, it is loaded by bloom and you should replace the ‘et-gf-open-sans‘ in the snipped above with your style id. Just be sure not to copy the suffix ‘-css’, like shown in the video.
3 Using your own Font
Now that you have your Google fonts removed from Bloom, you are left with very limited font options when designing the Opt-in forms. By default, your form will be using the font ‘Georgia’, which is okay but in most cases won’t match your CI.
To Use your own locally hosted web font (which I guess you already use), you will have to add custom CSS Code in the bottom Box when designing your Opt-In in Bloom 😎

Below is the code you want to insert. It is separated in Sections, which allow you to use some other fonts for the different parts of the forms. Be sure to replace the font-family “Poppins Light” with the one you want to use:
/* OPTIN MESSAGE */
.et_bloom .et_bloom_form_header p { font-family: "Poppins Light",Helvetica,Arial,sans-serif !important; }
/* OPTIN TITLE */
.et_bloom .et_bloom_form_header h2 { font-family: "Poppins Light",Helvetica,Arial,sans-serif !important; }
/* Input Fields, i.e. Email Text */
.et_bloom .et_bloom_form_container input { font-family: "Poppins Light",Helvetica,Arial,sans-serif !important; }
/* Button Text */
.et_bloom .et_bloom_form_container form button span { font-family: "Poppins Light",Helvetica,Arial,sans-serif !important; }
/* FORM FOOTER TEXT */
.et_bloom .et_bloom_form_footer p { font-family: "Poppins Light",Helvetica,Arial,sans-serif !important; }Code language: PHP (php)
And yes, I don’t like using !important any more than you do, but in this case it’s necessary because Bloom adds the font sizes hard coded 🙄
That’s it, now your form should look exactly the way you want 🤘
Be sure to check out our guide on how to preload you fonts and key requests, so your website will load blazing fast… Especially without google fonts 😉
We love 💚 Feedback, so if you have a questions left or it didn’t work for you, feel free to drop us a comment 👇


Great guide! I followed all the steps carefully and set the font as !important in Bloom’s custom CSS box, but it seems like it is ignored, on the front end I always see the default one chosen from the dropdown menu (Trebuchet in my case). I am already hosting the default font (Open Sans) locally using OMGF plugin. What am I doing wrong? Not that I care that much about the font itself (it’s fine as it is), but I’m curious to see if there’s a way to further optimise and speed up my website by getting rid of every extra font and extra http request 🙂
Link is www. smartius DOT it
Thank you and keep up the good work! I’m glad I discovered your blog!
Hi Davide,
thank you for your comment and for your kind words 😀
One Question: Did you do all the steps described after point 2, especially finding out the Query String used from the CSS and disabling it via wp_deregister_style ?
This was also the case for my site, but deregistering the style solved it for me 😉
Best Regards from Germany
Simon
This is just what I was looking for, thank you so much Simon😄